connect简介
Connect is a middleware framework for node.
Connect 是 nodejs 的中间件框架。何为中间件?中间件就是用户请求和返回结果之间的一个又一个筛选工具。正如 @Luics 所说“如果把一个http处理过程比作是污水处理,中间件就像是一层层的过滤网。”
中间件能在请求用户请求处理之前,进行一些预处理,而在返回结果之前,又进行一些返回之前的处理。非常类似于洋葱模型,一层一层的进入,又一层一层的退出。
Connect中间件的处理流程如下:
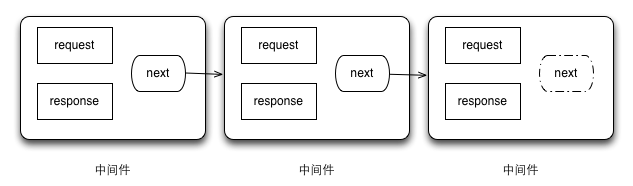
nodejs 中,http server 有两个参数传入,分别是 request 和 response 代表请求和响应结果,这两个参数也会被传入中间件中。此外,connect 中间件还有第三个参数:next 函数。通常使用该参数的方法是:next(); 。因此大家常认为 next 代表下一个中间件函数,但事实上,next 只是 connect 生成的一个函数,它的作用是告诉 connect 可以调用下一个中间件来处理 request 和 response 了。如果下一个中间件,则调用,如果不存在,就没有调用了。
参考:更多关于 conncet 的介绍请访问以下链接:
- connect github page
- connect doc page
- Luics 天猫鬼道 connect简介
- connct 内置中间件介绍
- 深入浅出Node.js:Connect模块解析一
- 深入浅出Node.js:Connect模块解析二
一个简单的目标
看完简介和一些深入的介绍之后,我们就可以开始着手做一个自己的中间件来方便我们的 web 开发了。
实践才是最好的老师,不踩坑就不能深入理解。
需求
现在笔者有这么一个需求:在本地进行 demo 页面开发的时候,对静态页面进行模块式开发,实现 html 页面之间的引用。譬如,做一个公用的 header 或者 footer ,以便其他页面进行引用。
问题
在没有 nodejs 之前,可以通过对 Apache 服务器进行一些配置,以支持 `SSI(Server Side Include)‘ 命令。通过类似
1 | `<!--#include virtual="./mod/header.html"-->` |
的命令来实现引用。
现在在 nodejs 环境下开发,就没有了这种支持。所以我们要自己动手,丰衣足食。没有的,我们就自己创造工具。
功能、接口设计
功能
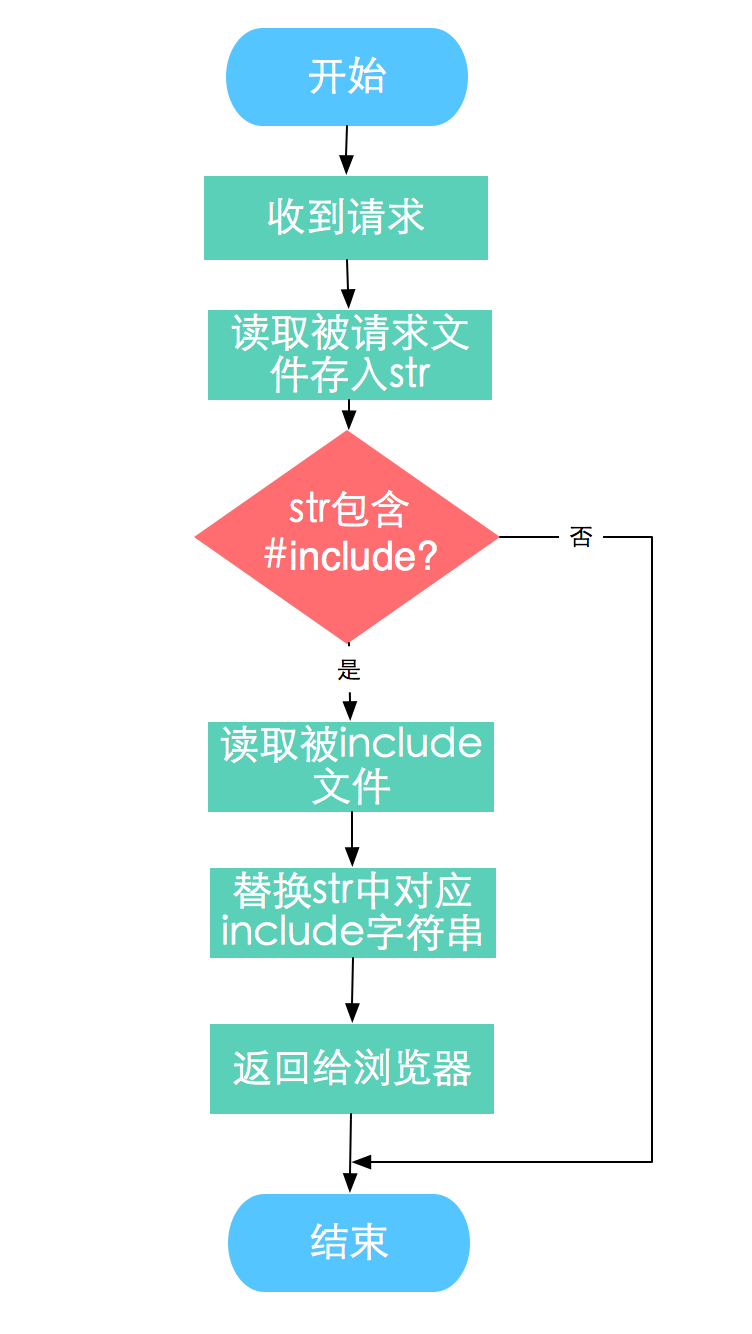
要实现的功能非常简单——当服务器收到对 html 文件的请求时,将请求的 html 文件中的类似 <!--#include virtual="./mod/header.html"--> 的字符串替换成对应模块的 html 代码,然后将请求的内容返回给浏览器。
流程图如下:
接口
中间件的接口,即为中间件调用者可以配置的参数。通过参数配置来使中间件正常工作,和动态定制。
这里我们需要考虑几个问题:
- 获取到 url 请求后,怎么访问到被请求的 html 文件?
- 怎么访问到该 html 文件中所
#include的文件? - 文件编码会影响吗?
- 是否需要输出 debug 信息?
以上几个问题是从功能设计中的流程图所分析出来的,也是我们实际编码时必须要解决的问题。
- 针对问题1,我们可以在 connect 中调用本中间件时传入 html 文件的根目录,然后解析请求 url 中请求的 html 文件名,两者组装起来,就是文件系统中该 html 文件的路径了,使用 nodejs 的 fs 模块可以访问到
- 针对问题2,
#include中的被引用 html 文件路径通常是相对于引用 html的,所以我们可以将应用 html文件路径和被应用文件的路径组合起来即可 - 针对问题3,这个问题其实是实际开发时遇到的问题,以后开发需要注意这一点。因为涉及到文件的读写和处理,所以需要指定文件编码
- 可以通过参数进行配置
综合上面几点,我们可以拟定以下接口:
1 | // 传入中间件的配置对象option: |
代码实现
代码组织
中间件都是node的扩展模块,好的模块应该有清晰的代码组织方式。我们可以参考一下 connect、express等模块的组织方式,通常都是采用以下结构:
1 | - moduleName/ |
即采用
- lib 目录存放模块的核心代码
- node_modules 目录存储依赖的模块
- index.js 文件暴露模块的接口
- package.json 文件来配置模块信息
- README.md 文件对模块的使用进行说明
package.json
设置模块名称、介绍、版本、依赖的模块信息等等,由于本中间件全部采用 nodejs 内置模块,因此没有设置模块依赖 dependencies 。
在这里,我给我的模块去了一个名字:connect-ssiinclude ,标识它是一个基于 connect 的中间件,作用是支持 ssi 命令中的 include 。
1 | // package.json |
更多关于 package.json 的配置见:npm doc package.json
index.js
nodejs 的模块系统的机制是,模块引用时,默认读取模块目录下的 index.js,即 index.js 能暴露出模块的公有接口。这样在自己的程序中,引用模块时,只需要指定模块目录的路径就行了,不用关心模块的核心代码在哪里。
1 | // index.js |
该文件只有一行代码,就是 require 模块的核心代码。
lib/include.js
这个文件就是核心代码所在了,我们需要在这里实现上面流程图中的所有逻辑。下面我们来解析下实现过程:
1 | // 内置模块的引用,分别为文件系统模块fs,路径处理模块path,url模块等 |
中间件发布
写完了核心代码,经过测试,就能够进行中间件发布了,让全世界的小伙伴都能用到我们的中间件。
要发布一个中间件,我们需要做下面这几件事:
README.md
一个完整的开源项目需要完善的文档说明。
我们不能写了代码就不管了,我们还需要教别人怎么用我们的代码,因此我们至少得写一个README.md,对模块的安装、使用、配置进行简要的说明。如果模块比较复杂的话,我们还需要专门建一个 doc 目录,为使用细节撰写说明文档。广受欢迎的开源项目都是这么做的。
下面是 connect-ssiinclude 的 README.md 文件内容:
connect-ssiinclude
A middle ware for enable ssi include patterns in your html and shtml files. It’s very useful during developments when
you write html files in the way of modules.
It will replace pattern like <!--#include virtual="./mod/header.html"--> with the actual header.html file and transfer
to your browser.
Install
1 | $ npm install --save connect-ssiinclude |
Usage
1 | var include = require('connect-ssiinclude'); |
Option
1 | include(option) // use a option object to config connect-include |
在 npm 上发布
所有代码和文档准备好之后,我们就可以发布中间件了。发布到哪?npm( node package manager ,node包管理器)。
安装
unix 下安装: 见 npm github page
1 | $ curl -L https://npmjs.org/install.sh | sh |
npm adduser
首次发布之前需要创建 npm 用户,需要在终端运行:
1 | $ npm adduser |
根据指示进行输入以完成创建。
npm publish
创建好用户之后就可以发布了,终端运行:
1 | $ npm publish path/to/your/module // 指定你的模块文件夹路径 |
可能会出现你的模块名称已经被别人使用了等等问题,按照报错进行修改即可。
大功告成!
不出意外,现在你已经成功编写并在npm上发布了一个connect中间件了。
撒花~